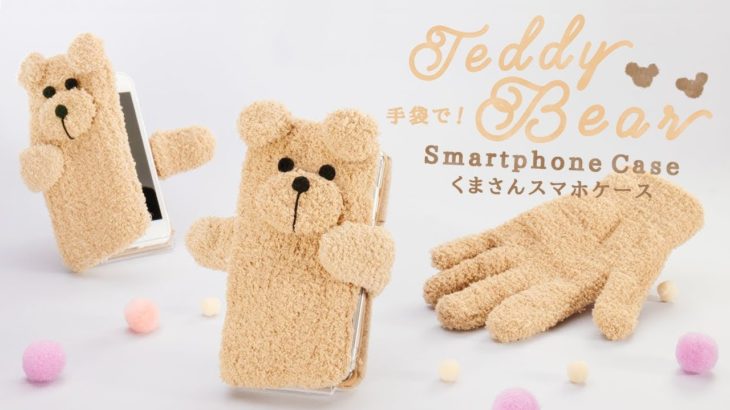
【Materials】
· Thick paper
· clear file folder
· Permanent marker
· Scissors
· Sticker felt
· Beige cloth
· Double-sided tape
· Glue gun
· magnet
· Brown gloves
· Adhesive for cloth
· Black string, felt ball
· Smartphone case
【Steps】
1. Draw a picture of smartphone case on thick paper in the same size as the clip, copy it on clear file folder and cut it out. Cut the file according to the line and lightly fold it.
2. Flip the sticker felt and place the clear file on top, trace with marker and cut it out.
3. Place the file on light brown cloth in the same way and trace it with marker. Cut it out one-size larger and paste double-sided tape on the inside so as to wrap the file. Create small cut and fold the corner neatly.
4. Remove the backing paper of the sticker felt and carefully stick it. Do not forget to stick the handle part.
5. Attach the magnet to the handle and the part where the handle and the surface meet with a glue gun.
6. Cut out thick gloves as shown in clip and close the cut end near the wrist with glue. Flip it over once fixed and cover the surface of the smartphone case with it.
7. Place the shortly cut fingertip of the glove on a file cut into an ellipse. Flip one part of the long cut over and put a magnet in two places. The other part is placed on the handle of the case.
8. Stick each part on the surface of the case with glue. For mouth part, make with strap and felt ball and stick. Stick the felt ball eyes on immediately above.
9. Turn over the part with the magnet and stick it to the case with glue.
10. Open the case, stick the commercially sold smartphone case with glue gun, and completed !!
寒〜いこの季節、たくさん使うスマホのケースも手触りがいいものがいいですよね。今回は100円ショップの手袋でモフモフくまさんのスマホカバーを作りました!
【用意するもの】
・厚紙
・クリアファイル
・油性ペン
・はさみ
・シールフェルト
・ベージュ色の布
・両面テープ
・グルーガン
・マグネット
・茶色の手袋
・裁ほう上手(布用接着剤)
・黒い紐、フェルトボール
・スマホケース
【作り方】
1.厚紙に動画のサイズでスマホケースの図を描き、クリアファイルに入れて書き写し、切り取る。切り取ったファイルを線の通りに切り、軽く折り目をつける。
2.シールフェルトを裏返して上にクリアファイルを乗せ、ペンで写し取ってきりぬく。
3.同じようにうす茶色の布の上にファイルを乗せ、ペンで写し取る。一回り大きく囲んで切り取り、内側に両面テープを貼ってファイルを包むようにはり合わせる。角も切り込みを入れて綺麗に折り込む。
4.シールフェルトの裏紙をとり、丁寧に貼り付ける。取手部分も忘れずに貼り付ける。
5.マグネットをグルーガンで取手と取手が表面に届く部分に貼り付ける。
6.厚手のもこもこした手袋を動画のように切り取り、手首に近い方の部分の切り口を裁ほう上手でとめる。固定されたら裏返して、スマホケースの表面にかぶせる。
7.手袋の短く切った指先部分を、楕円に切り取ったファイルにかぶせる。長く切った部分の1方は裏返し、2箇所にマグネットをつける。もう一方はケースの取手にかぶせる。
8.それぞれの部分を裁ほう上手でケースの表面にとめる。口部分は紐とフェルトボールで口元を作って貼り付け、すぐ上にフェルトボールの目をつける。
9.マグネットをつけた部品をもう一度裏返し裁ほう上手でケースにはりつける。
10.ケースを開き、市販のスマホケースをグルーガンで貼り付けて完成!!
反対側にはカードも入っちゃいます♡
可愛くて便利なスマホケース、皆さんもぜひ作ってみてください⭐